
Have you been generating leads through Facebook Lead Ads lately? Not getting the results you’re hoping for? Facebook’s conversion API (CAPI) might just help you improve your targeting and generate more qualified leads at a lower cost.
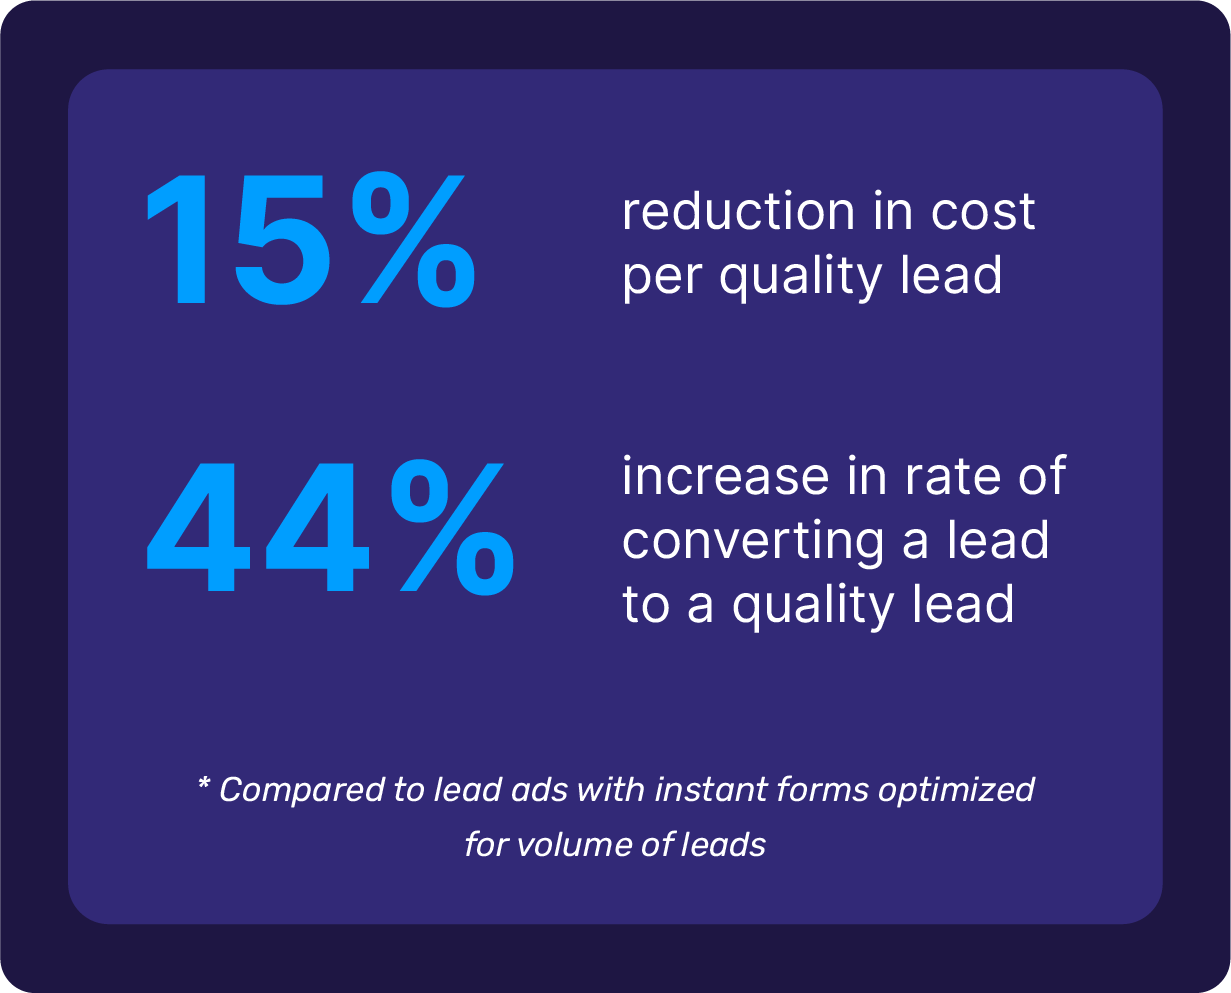
If you haven’t heard about it already, CAPI can play a game-changing role in improving your ad targeting and results by delivering more personalised and effective advertisements. According to Meta, the tool can reduce the cost per quality lead by 15% and increase the conversion rate of leads by 44%, compared to lead ads with instant forms optimised for lead volume.

This article explains everything you need to know about Facebook’s Conversion API, how to integrate it into your system, and how to make the most of it to improve your lead conversion rate.
So what is Facebook Conversions API?
The Conversions API is a tool from Facebook that allows you to target a more precise audience for your ads by analysing your customer data or conversions data. By sending this information directly from your sales systems to Facebook, the platform can better identify the types of leads most qualified for your business. When you launch your next ad campaign, Facebook Ads takes this data and then targets similar audiences who have previously converted, improving the effectiveness of your ads.
You can integrate Facebook’s Conversions API with the platforms where you store and update your customer action data, including your website, eCommerce store, or CRM and send conversions data back to Facebook.
Even if you solely rely on Facebook for lead generation or customer interaction, you can still use the Conversions API to better target your core customers within Facebook through CRMs like Privyr. We’ll discuss CAPI integration in detail next.
How to integrate Meta Conversions API with your system
Your Facebook Ads are not activated with the Conversions API (CAPI) by default. CAPI is a tool that requires setting up a connection between your server (where your website or app runs) and Facebook’s servers.
To start using CAPI, you’ll need to set it up and choose which customer actions (like purchases or sign-ups) you want to share with Facebook as a type of successful action, or conversion.
Implementing Conversions API might sound technical at first, but we’ll walk you through the simpler process of setting it up, even if you’re not a tech expert. Here’s a step-by-step guide:
Step 1: Choose your integration method
There are a few different ways to integrate CAPI with your system. It may depend on which platform you store and update your lead conversion data. This could be your website or app. If you don’t have a website and want to improve your ad targeting on Facebook, there are external tools to help you do so. Here are the options:
Option A: Use a partner integration
Many website and e-commerce platforms, such as Shopify, WooCommerce, and BigCommerce have built-in support for Conversions API. If you have built your website or online store on these platforms, you can use Partner Integration to connect with Conversions API. Here’s how to do it:
- Log in to your platform’s dashboard.
- Find marketing or Facebook integration settings.
- Follow the steps to connect your store or website to Facebook using the Conversions API.
Option B: Use Facebook’s Event Setup Tool
A good starting point for non-technical users is to use Event Setup Tool if you’re using Facebook Pixel (a piece of code you add to your website to track visitor’s actions). The Event Setup Tool sends standard events on your website back to Facebook without needing to code. However, keep in mind that this method might not provide you with the full capabilities of Conversions API.
Option C: Setup the server-side code
If your website is custom-built or your platform doesn’t support partner integrations with Facebook, you’ll need to set up the server-side code to send your user data back to Facebook. You may need the help of a developer in this case if you’re not familiar with the technical aspects.
A developer will set up the server-side code while ensuring that your conversion data is sent securely and in compliance with privacy regulations.
Option D: Use a partner tool with Conversions API integration
If you don’t have a website or your platform doesn’t attract enough visitors, you may want to understand your target audience based solely on user engagements on your Facebook ads. For instance, you might be running Facebook Lead Ads and want Conversions API to identify the type of users who are filling out your forms so Facebook Ads can automatically target similar people in future campaigns.
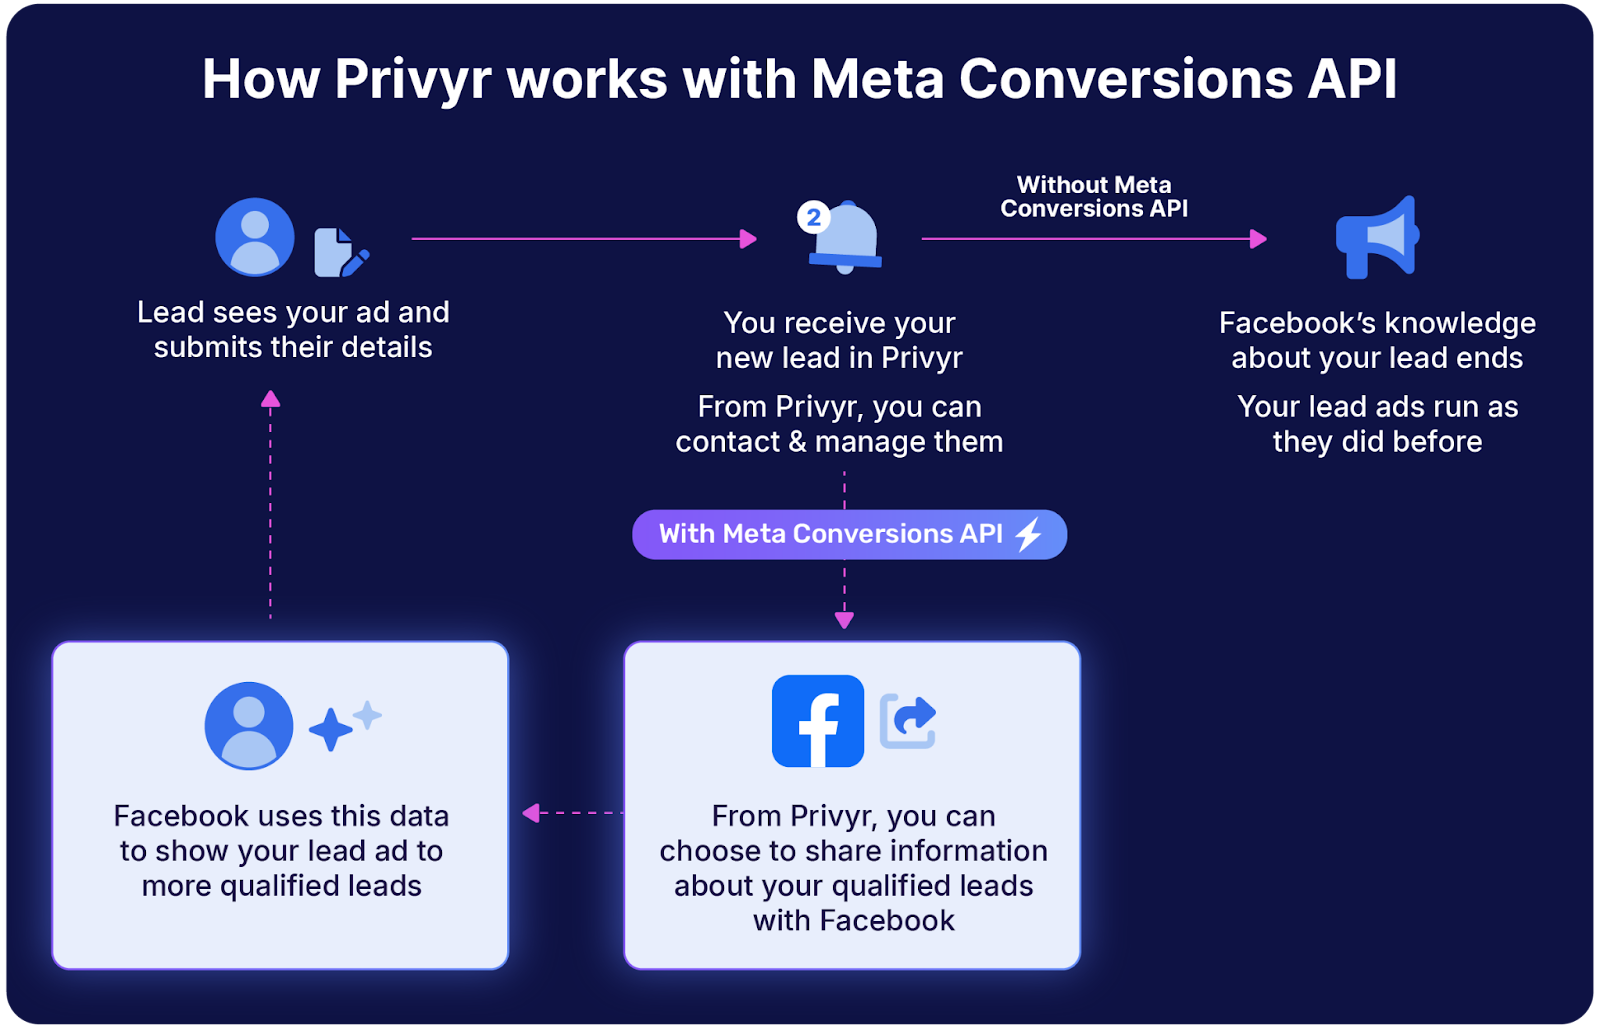
In this case, a partner tool or CRM like Privyr can help you send your lead conversion data to Facebook and improve your ad performance. When you’re running lead generation ads, the tool automatically imports your Facebook leads into your system while recording information about the type of lead you’ve successfully converted. The tool then sends this data back to Facebook, helping make future ads more efficient by improving their targeting.
Privyr is an official partner CRM with Meta Conversions API. It’s the first mobile-friendly CRM that’s integrated with CAPI – perfect for busy salespeople who are always on the go.!
Step 2. Identify the events to track
Events are the actions people take on your websites or apps. Tracking them helps you understand customer behaviour and optimise your ads accordingly.
Common events to track may include Purchase (when a customer completes a purchase), Lead (when a user shows interest, such as filling out a contact form), Add to Cart (when a visitor adds a product to their shopping cart), Sign-up (when someone creates an account or subscribes to your newsletter), Booked Appointment (when someone successfully books a meeting with you), etc.
Step 3. Configure data sharing settings
After identifying what to track, you can now decide what data to share.
Standard data includes basic information like the event type and timestamp while Customer Information Parameters are additional details such as email addresses or phone numbers. This information can help improve your ad targeting.
You should hash the data before sending it. Hashing transforms data into a secure format before sending it to help protect personal information. Always ensure you’re complying with privacy laws and have the necessary permissions to share customer data.
Step 4. Test
Before launching, test to ensure everything is working correctly. You can use Facebook’s Test Events Tool to verify events are being received by Facebook. Check if any data is missing or if there are errors to fix.
Step 5. Monitor and optimise
Once you’ve set up the Meta Conversions API, keep an eye on your ad performance and event data. With more data, you’ll be able to make more informed decisions about your advertising strategy.
You can review metrics to see how your ads are performing and use insights to adjust your campaigns for better results.
Benefits of Conversions API
Meta Conversions API is designed to improve the effectiveness of your ads through data accuracy and customer insights. The straightforward benefits of Conversions API include Higher Return on Ad Spend (ROAS) and lower cost per lead. Here some more benefits of using Conversions API:
Improved ad targeting
CAPI allows you to share customer actions directly with Facebook. This data is more accurate and complete. Based on this, Facebook understands your core customer base and shows your ads to people who are more likely to take action.
For instance, if someone makes a purchase from your website or fills out your Facebook Lead Form, that information is sent to Facebook. With this information, Facebook will target similar people who might also be interested in your products in future ads. This doesn’t just improve your ad targeting but also possibly lowers your cost per lead.
Improved ad measurement
The Conversions API provides a more reliable way to track your ad performances. Since the information comes directly from your server, it’s less likely to be affected by issues such as ad blockers or privacy settings. Also, you can better understand the full customer journey, starting from a user seeing your ads to engaging with it. This can help you understand what’s working and what’s not.
Future-proof solution
Traditional tracking methods like cookies are becoming less reliable due to increased privacy measures. Conversions API doesn’t rely on cookies or browsers. By using it, you’re preparing your business for future changes.
How to make the most of CAPI
Facebook’s Conversions API (CAPI) can significantly enhance your advertising efforts. However, to perform optimally, you should ensure it sends correct customer data to Facebook. Here are some best practices to fully leverage its benefits:
1. Use the Conversions API with the Facebook Pixel
If you’re sending data from your website or app to Facebook through Conversions API, using the tool along with Facebook Pixel ensures you collect as much information as possible about customer actions. It helps reduce data gaps and improve accuracy.
To install the Facebook Pixel, you should place the Pixel code on your website to track browser-based events. Once it’s complete, you can set up the Conversions API by connecting your server to Facebook to communicate server-based events.
2. Define qualifying action accurately
Accurate data helps Facebook show your ads to the right people. That being said, it’s really up to you to decide what a “qualified” action is and means for your business. Qualifying can be different for different businesses. It’s really important in order for you to optimise on the right metric.
For instance, a purchase can be the right qualifying action for a product-based business. However, for businesses that rely on client communication for sales, the right qualifying action could be a form submission, booking of an appointment, or other actions that do not necessarily involve a financial transaction.
Don’t forget to include all relevant details about customer actions while sending the data. Also, stick to Facebook’s recommended event names (like “Purchase” or “AddToCart”) for consistency.
3. Implement event deduplication
Deduplication is the process of eliminating duplicate data entries. If you’re using both the Pixel and CAPI, it’s possible to send the same event twice. Deduplication ensures each event is counted only once.
You can use unique identifiers for each event so Facebook can recognise duplicates. Ensure both methods send the same Event ID for the same action.
4. Provide customer information parameters
Detailed customer information helps Facebook to match events to user profiles more accurately. This can play a crucial role in delivering ads to more precise targets.
Include information like email addresses or phone numbers in a secure, hashed format. The match rate is better with more details.
5. Monitor and test
Regular testing ensures the connection is functioning as it should. You can identify issues early before they impact your ad performance.
Use Facebook’s Test Events Tool to see your real-time event data and verify setup. Also, check the event manager to monitor the data that Facebook receives.
6. Choose the right integration method
An integration method that works well with your existing systems can make your job so much easier. Also, some integration methods are simpler and require less technical expertise. You’ll not only save time and effort but also extract accurate information for your next ad campaign on Facebook.
If you use platforms like Shopify or WooCommerce, you can make use of their partner integration that offer easy CAPI setup. If you don’t have a website or an app, use mobile-first CRMs like Privyr to enhance your ad efforts from the comfort of your smartphone. If you have a custom website, seek a developer’s help to deal with the technical setup.
Also, Facebook may update CAPI features or requirements from time to time. So, keep your setup functional by updating it. Stay informed by following Facebook’s announcements and updates.
How Privyr helps you maximise your CAPI benefits
If you’re generating leads for your business through Facebook Lead Ads, here’s the truth: Meta Conversions API certainly helps you generate higher quality leads, but that doesn’t guarantee success if your sales process is not efficient. For instance, if you contact your leads late, don’t nurture them well, or have an inconsistent follow up schedule, you’ll end up losing your leads even if they are highly qualified.
Things can get challenging from the get go if you’re managing your sales process manually.
But don’t worry! Privyr is a mobile-first CRM that streamlines your whole sales process and makes it effortless to download, contact and follow up leads. It’s also the only mobile-first CRM that’s integrated with an in-built Meta Conversion API. With Privyr, you’ll make your Facebook ads more effective and efficient while increasing your sales by up to 300%.

With Privyr, you don’t need any additional tools or resources to connect to Facebook’s Conversion API. Just sign up, download the app to your mobile device, connect it with your Facebook page, and integrate Conversions API.
Here’s how to connect Privyr with your Facebook page:
Step 1. Create your account and download the app
Go to www.privyr.com and create your account. Then, install Privyr app on your mobile device. Privyr is available on App Store and Playstore for iOS and Android devices.
Step 2. Connect Privyr with Facebook
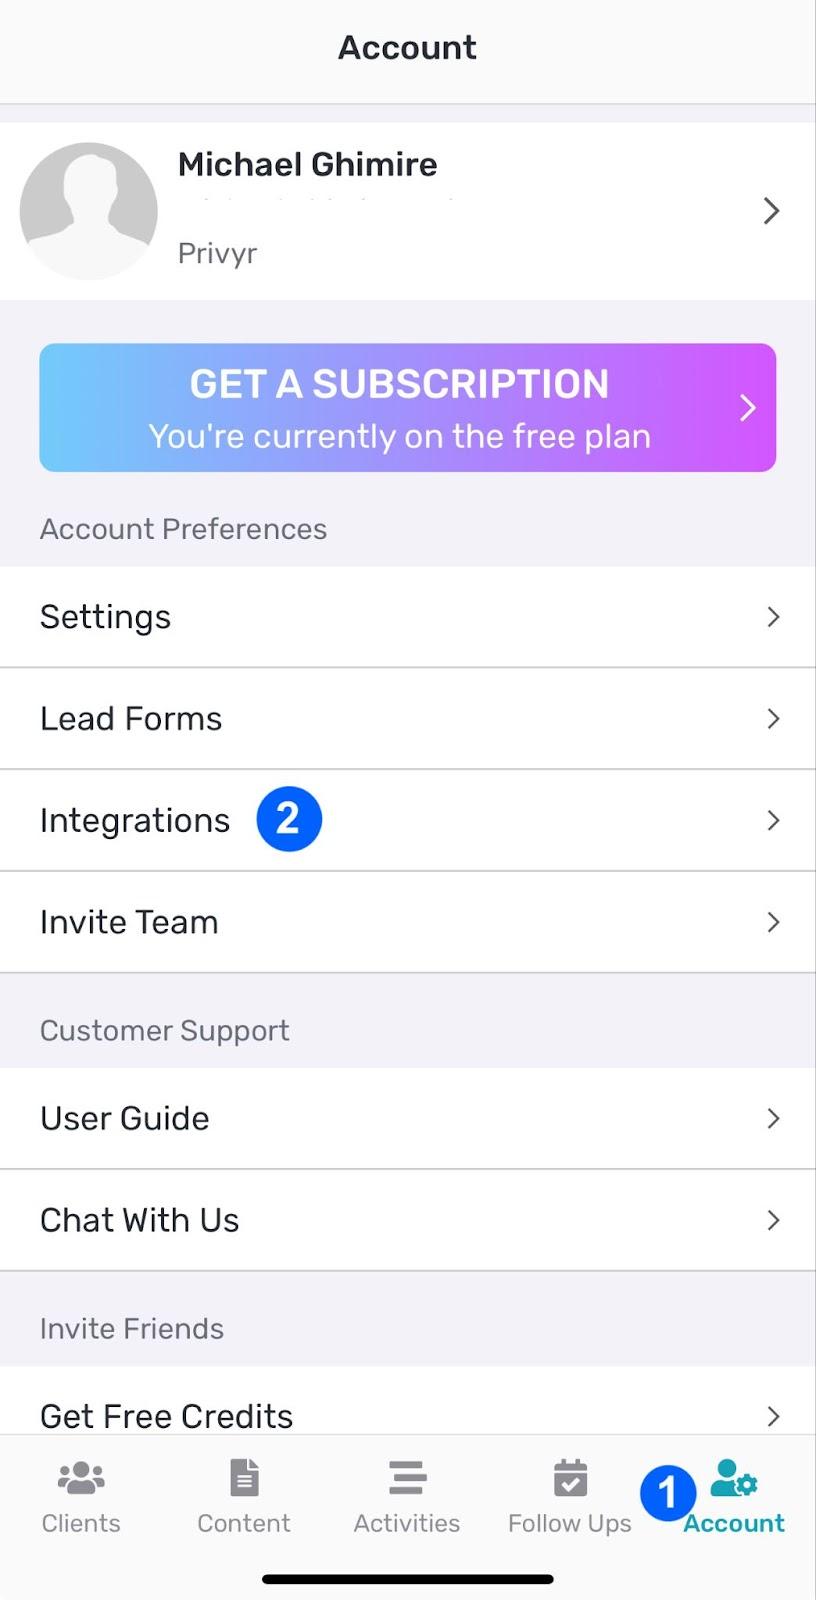
In the app, tap on Account and select Integrations.

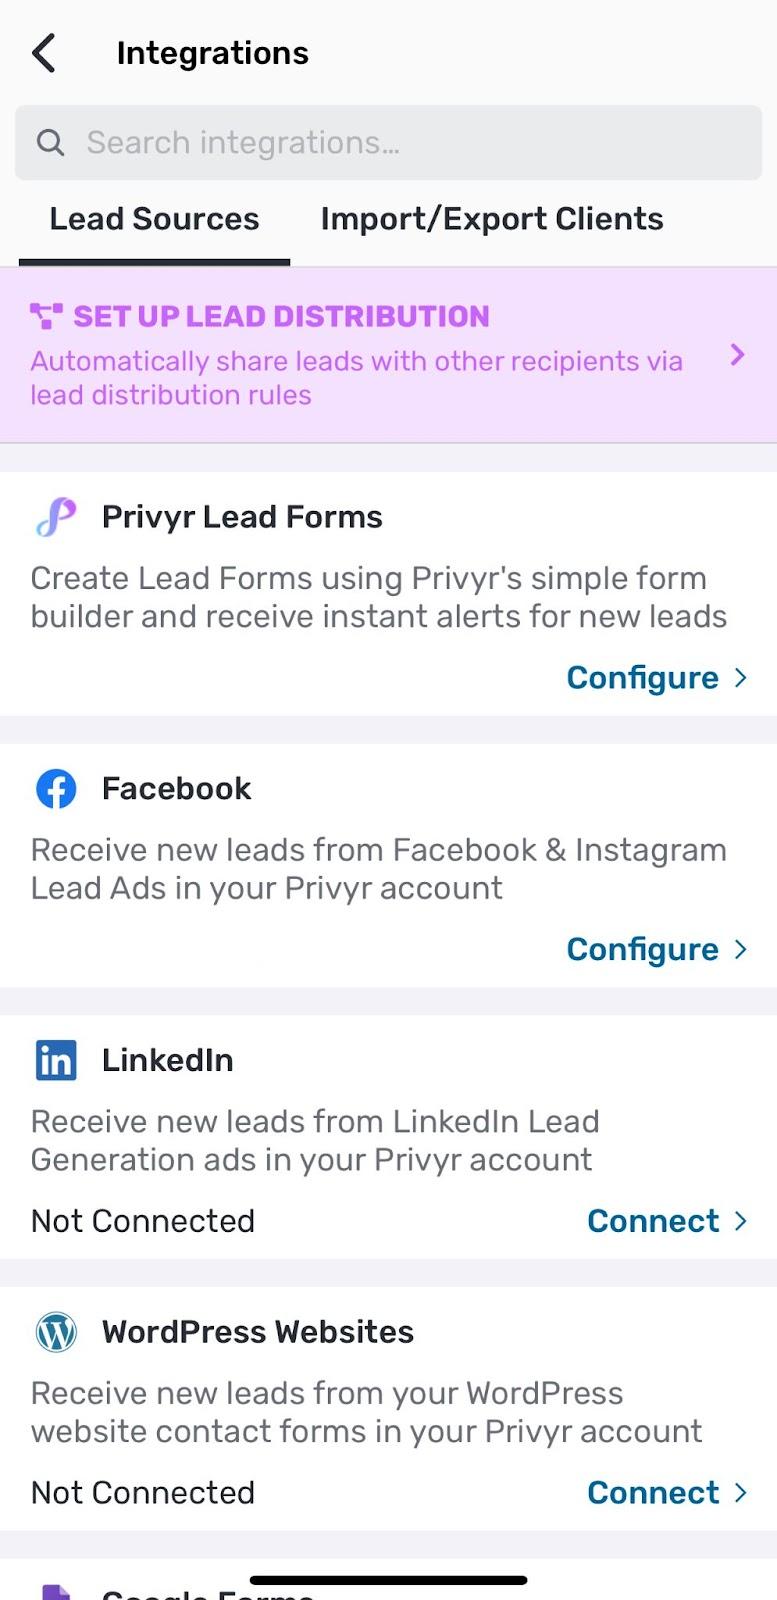
Under the Lead Sources tab, you’ll find lead sources that you can connect with Privyr and automatically receive alerts when new leads come in. Select Facebook and tap on Configure. This will redirect you to your Facebook page. Click on continue. Your Privyr account is now connected with Facebook.

Now that you’ve connected your Privyr account with your Facebook page, it’s time to integrate Meta Conversions API. It’s a simple process that you can follow easily. Here’s how to do it:
Step 1. On your Privyr app, go to Account > Settings > Meta Conversions API
Step 2. Log in by clicking Login with Facebook. You may need to confirm the Facebook Profile that you want to continue with.
Step 3. You’ll then be prompted to Connect Privyr to Facebook. Click Next.
Step 4. Next, you’ll be prompted to confirm settings. Select the Business Portfolio and Meta Pixel that you want to connect to Privyr, then click Continue.
Step 5. You’ll now be asked What is Privyr allowed to do. Enable all options and click Next.
Step 6. Click DONE.
After completing the steps successfully, you’ll see your connected Facebook Page, Pixel Name and ID.
With Privyr, you’ll receive real-time mobile alerts for new leads generated from your Facebook Lead Ads. You can instantly access your leads and contact them with auto personalised messages on messaging apps like WhatsApp, iMessage, or Telegram without typing, copy-and-pasting, or saving the details to your phonebook. Privyr also automatically schedules follow-up reminders for each lead. Plus, you can also automatically distribute leads to your team members by creating lead distribution rules for different Facebook Ads.
Conclusion
Meta’s Conversions API is an excellent tool for boosting the efficiency of your ads. And with platforms like Privyr, you can leverage this technology to enhance your ads—even without a website or deep technical skills.
If you’re generating leads on Facebook, remember that while acquiring qualified leads is crucial, managing and nurturing them afterward is just as important. Make sure you are not only targeting the right audience but also handling your sales process with equal effectiveness.


")
